Data! This is all that our future is going to be about. Even our present is depending more and more on data. When this huge data comes up we ought to make sense out of it to know what it’s all about. Data from countries worldwide is coming up. We need to store both the data that has already been collected and the continual coming data. In the future, data and databases are going to grow exponentially and with this, need for data-handling is growing utterly. Data! This is all that our future is going to be about. Even our present is depending more and more on data. When this huge data comes up we ought to make sense out of it to know what it’s all about.
But how to manage this abundant amount of data with a simple language as SQL?
Lucky for you, this article is going to be all about that.
First of all, what is SQL and why you should use it?
Well SQL stands for Structured Query Language that is used by data analysts, software engineers, and any professionals who want to manage data and databases.
It is called structured because the data is stored and accessed in a structure of rows and columns. The simplest of SQL queries follow a structure of [what you want to do]+ [where you want to do] + [change you want to do]+ [condition to be applied]. You’ll see that as you proceed.
Now, SQL is the easiest language to manipulate data and handle RDBMS (Relational DataBase Management System), i.e, where data is stored in a tabular form of rows and columns.
We are going to learn this through PostgreSQL. I hope you have installed this on your computer. Although the queries are the same for any SQL environment, however, you may find a difference in the way these environments interact with users. Let’s start then.
Introduction to databases
A database plays as storage and accessing medium to our data. We can keep, modify, update, alter, etc our data through a database easily. Let’s create on for you, shall we?
Run your pgAdmin and log in by entering the password you have selected for your PostgreSQL. To do this task, you are required to have a gist about datatypes and their functioning.
Click on the Servers to expand it and you’ll see the version of your PostgreSQL. You are now required to expand it too to see “Databases”.
- Right-click on the “Databases” and click on create > Database… See the image below.
- Now, fill the name you want to give to your database. Here, it is “Test student”.
- Click on “save”.

Your database has now been created. You can check it under the “Databases” section. It is normally stored above the older databases.
Now, let’s create tables for this database. Just one icon ahead of “Browser” (refer image above) is your query tool. Click on this tool to enter the IDE.
We will be using queries of DDL also known as Data Definition Language.
Data Definition Language is used to define the database schema dealing with the structure of DataBase objects. It consists of commands like create, drop, alter, truncate. Create a table called “class” that will contain the basic information of the students that is, their rollno, name, email, and totalmarks. ‘rollno’ is set to be a unique identification of the students and hence a Primary key. We don’t want names with empty values hence NOT NULL.
1. Create a table called “class” that will contain the basic information of the students that is, their rollno, name, email, and totalmarks. ‘rollno’ is set to be a unique identification of the students and hence a Primary key. We don’t want names with empty values hence NOT NULL.
2. Use the following ‘CREATE’ query to create a table :
CREATE TABLE class(
rollno serial PRIMARY KEY,
names char(50) NOT NULL,
email varchar(60),
totalmarks float(5));
3. Now, you have successfully created a table named “class”. Check if it is made from Database > Teststudents > Schema > public > Tables. Check its columns as Tables > Columns.
4. Let’s make another table related to this. It will help us in joins and merging as the article proceeds. Use this query to enter values into the table:
CREATE TABLE address(
email varchar(60) PRIMARY KEY,
residence varchar(100),
mobile int
);
Here email is the primary key that will uniquely identify the student.
Insert values into tables
To proceed, we need to be aware of DML or Data Manipulation Language. Once a schema has been defined in the database, we manipulate [ add, delete, update, merge data] the data in it the way we want. For this, we need Data Manipulation Language.
Let’s proceed deeper. Reassure that you have opened/expanded the right database. Use the down below code to enter values:
INSERT INTO class(rollno, names, email, totalmarks)
VALUES(100,'Shree', 'shree@mail',432);
INSERT INTO class(rollno, names, email, totalmarks)
VALUES(101,'Danielle', 'Danie@mail',469);
INSERT INTO class(rollno, names, email, totalmarks)
VALUES(102,'Meera', 'meer@mail',399);
You can add more entries if you wish. I will be adding more to make ‘joins’ clearer to you as we proceed.
Reading the tables
For this, we use the ‘SELECT’ statement. The select statement is the only statement of Data Query Language. Perform the Query:
SELECT * FROM class;
You will receive output as:
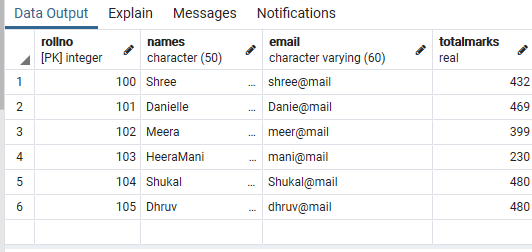
Click on messages to see a message saying something like
“Successfully run. Total query runtime: 490 msec.
6 rows affected.”
A different message may be given to you. To select single or multiple columns use queries:
SELECT names FROM class;
SELECT names,totalmarks FROM class;
You can add as many columns as you want by separating them with commas.
Update and Delete from a table
Let’s say you entered names wrongly and now you want to change them to right values. How will you do that?
Let’s see how. Perform the following queries:
You notice that the ‘M’ is capital in the name and it shouldn’t be like that. So, perform query:
UPDATE class SET names='Heeramani'
WHERE names= 'HeeraMani';
Suppose you want to change multiple values in a row then do this:
UPDATE class SET names='Daniel', totalmarks=400
WHERE names= 'Danielle';
Now, if you want to delete records:
For all records:
DELETE FROM class;
To Delete the whole table:
DROP TABLE class;
To delete a single record from class:
DELETE FROM class WHERE names='Dhruv';
Adding a new column to the table
All the entries are usually updated by rows. But, what if you want to add a column to the SQL database and then add values in that column?
Follow this query:
ALTER TABLE class ADD residence varchar(60);
We created a new column residence in table class. You can use the update query above to add values into columns one by one.
Filtering data in SQL
We can filter our data in SQL on different filters. This helps us in analyzing and visualizing data to get meaningful results. For this, we need to study the functioning of clauses in SQL.
THE WHERE CLAUSE
Observe the query:
SELECT * FROM class WHERE totalmarks>400;
This will select the records of students where marks are more than 400.
CONDITIONING WITH THE WHERE CLAUSE
AND, OR, NOT, BETWEEN and IS NULL functions can be added to the where clause to have specific values.
Suppose we have another table “grades” in the database “Teststudent” containing marks of all the students. Now you want to find the students excelling both in science and math. Perform the query:
SELECT * FROM grades
WHERE maths>80
AND science>80;
Now, you want to know students who are either scoring in English or Science:
SELECT * FROM grades
WHERE english>80
OR science>80;
Now, the students whose computers marks have not been added:
SELECT * FROM grades
WHERE computers
IS NULL;
The record of students whose science marks are added or are not null:
SELECT * FROM grades
WHERE science
IS NOT NULL;
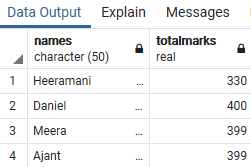
You can also look specifically between two values with between clause:
SELECT names,totalmarks
FROM class
WHERE totalmarks BETWEEN 300 AND 400;
Output for ‘BETWEEN’ will be as:
THE GROUP BY CLAUSE
Observe the code below:
SELECT COUNT(rollno),residence
FROM class
GROUP BY residence;
Now, see the output:
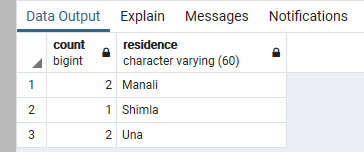
It has given you the count of ‘rollno’ from the table of class grouped by their residence. This COUNT(rollno) is an aggregate function that adds granularity to our data.
Also, note that if you remove ‘residence’ after COUNT(rollno) then the residence table will not be seen. In simple words, the GROUP BY command is an internal logical command whose results are not directly visible to the output. GROUP BY will do its work behind the scenes.
THE HAVING CLAUSE
The WHERE and the HAVING clause have a similar working of filtering data based on a condition. The problem with the WHERE clause is that it fails when are working with aggregate functions.
So, the HAVING clause works as the WHERE in aggregate functions. Have a glance at the query:
SELECT COUNT(rollno),totalmarks,residence
FROM class
GROUP BY totalmarks,residence
HAVING totalmarks>350;
The data now is Grouped on behalf of totalmarks and residence for all the students HAVING marks more than 350. The result will not contain any values for the students below 350 marks.
The output will have the values for COUNT(rollno), totalmarks, and residence.
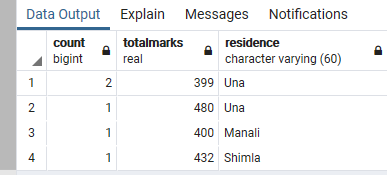
An Important point to note is that whatever is in SELECT statement columns must also be in GROUP BY statement otherwise it will generate an error.
However, Whatever is in GROUP BY statement columns may or may not be in the SELECT statement. Try the following code:
SELECT COUNT(rollno),totalmarks
FROM class
GROUP BY totalmarks,residence
HAVING totalmarks>350;
THE ORDER BY CLAUSE
Do you want to view this data in a proper order by marks to figure who stood first second and third? Well, do this:
SELECT names,totalmarks
FROM class
ORDER BY totalmarks DESC;
You can use ‘ASC’ in the place of DESC view data in the ascending order.
This how my class table looks like:
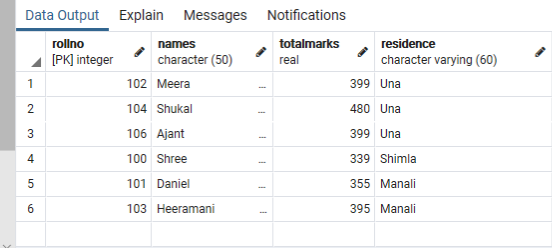
This is how my grades table looks like:

Notice that roll numbers 102 and 106 are not entered in grades.
Similarly, roll number 107 is not in table class.
Also, notice that the ‘totalmarks’ column is “null” or empty in grades. Your table may or may not have it empty whatever you wish it to be.
Performing JOINS on the tables
THE INNER JOIN:
In this join, only the common entries are shown as the output.
Here, you can interchange the FROM statement’s class with JOIN statement’s grades and the result will still be the same because we are finding the common entries among them.
SELECT class.names, grades.english
FROM class
INNER JOIN grades ON class.rollno=grades.rollno;
Output:
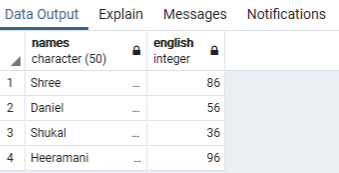
We can see that roll no 102, 106, and 107 are not shown in here simply because they are not common to both the tables.
THE RIGHT JOIN
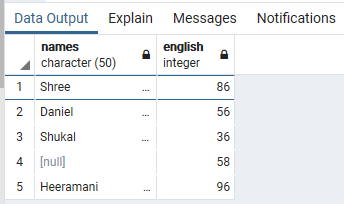
In this join, the entries of the RIGHT table, which is the one used with FROM, are shown.
This will include both the entries of the right table (here, grades) and common entries that are common to the left (here, class) and the right table.
Query for RIGHT join:
SELECT class.names, grades.english, class.rollno
FROM class
RIGHT JOIN grades ON class.rollno=grades.rollno;
Output:
The 4th entry is roll no. 107 from the grades because it is present in the grades table along with all other entries.
THE LEFT JOIN
This query will return all the entries of the left table (here, class) and the common entries between the left and the right table (here, grades).
SELECT class.names, grades.english
FROM class
LEFT JOIN grades ON class.rollno=grades.rollno;
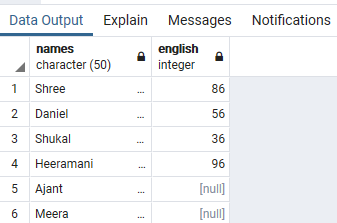
The entries of the 5th and 6th index do not exist in the right table still they are shown by the left join.
An important point to note is that if you interchange the left and the right table then left join works as right join.
And the right join becomes left if the tables are interchanged in it.
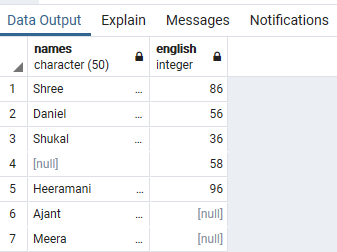
THE FULL OUTER JOIN
It will give out all the entries of the SELECT statement irrespective of whether they are common to the tables or not.
Perform the following query:
SELECT class.names, grades.english
FROM class
FULL OUTER JOIN grades ON class.rollno=grades.rollno;
You can add the following statements to see how the result differs:
ORDER BY grades.english DESC;
ORDER BY class.totalmarks DESC;
Try different combinations of the conditions and clauses.
CONCLUSION: In this article, we studied about SQL and its importance in handling databases. We studied about various clauses and filters used in SQL. I hope this article was helpful for you if you are a beginner in SQL. If you have any queries or suggestions, please comment below. Stay tuned for the next article.


